Tag: Premiere Pro

  • Top 10 Less Known Keyboard Shortcuts for Premiere Pro CC 2014

    There are obvious shortcuts that everyone needs to know, like how to use the arrow tool or the blade tool, and then there are shortcuts that are a little less obvious. Those are the shortcuts that I’m hoping to go over in this video. Chances are if you are seasoned in Premiere, you know some of these, but hopefully I can shed some light on some that you didn’t know, including some custom keyboard shortcuts that I set up.

    The shortcuts I go through:

    The Bonus Keyboard Shortcut:

    Keyboard Shortcut Dialogue
    Opt+Cmd+k

    1. Ripple Trim Previous / Next Edit to Playhead
      Q / W
    2. Slip / Move / Trim with Keyboard
      Cmd+ Opt ← → / Cmd ← →  & Opt+↑ ↓ / Opt+ ← →
    3. Panel Windows
      Shift+1 = Project Panel
      Shift+2 = Source Monitor cycles through open clips
      Shift+3 = Timeline Panel cycles through open sequences
      Shift+5 = Effects Control
      Shift+8 = Media Browser
    4. Trim Edit/Toggle Trim Types
      t/ Cntrl+t
    5. Nudge Audio Volume Down  & Up
      [ & ]
    6. Select Next & Previous Clip
      Cmd ↑ ↓
    7. Replace Clip Match Frame
      Opt+Shift+Drag

      Custom Shortcuts

    8. Show Video / Audio Keyframes
      Cntl+k / Cntl+Shift+k
    9. Delete Tracks
      Cntl+Opt+Cmd+Delete
    10. Set to Frame Size
      Opt+Cmd+F
  • New Features in Premiere Pro CC 7.0.1 Update!

    Well, it seems Adobe has kept their promise to use the new Creative Cloud platform to deliver a whole slew of new features. Now I don’t just mean bug updates as we had seen in the past with the Creative Suite, I mean upwards of 25 new features. In this video we go through the biggest changes to Premiere Pro CC and what you should know and expect from these new features.

    And yes, I don’t talk about in this video and I haven’t tested it myself, but there is a fix in this update for the horrible Multicam bug that a lot of users were experiencing!

    Check out the video as these really are some big new features.

    For a full list of features visit this link.

  • Working Around a Premiere Pro CC Bug to Sort in Icon View

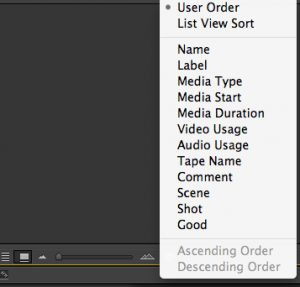
    So, if you are like me, you were really excited that Premiere Pro CC got the much needed ability to sort in Icon View. There are a number of predefined methods you can sort by, and you can even create a custom sorting order by using metadata in list view and choosing the “List View Sort”. For more info on these great new features, see this article.

    ListView

    However, the big disappointment is that as of right now, these custom sort methods don’t actually work in List View or Icon View. Meaning, you can click on the column header to sort, but it just won’t take! You can see this issue in the video linked to above. Now, this post isn’t intended to bash the engineers at Adobe, hopefully they are hard at work on the solution as we speak. It is merely intended to give you guys a potential work around.

    For me the issue was that I wanted to be able to sort in Date Created order. I had a number of cameras that name their files differently, shoot to different formats and frame rates, and don’t shoot any meaningful timecode. If I merely sorted by Name, it would sort each camera in Date Created order, but all 3 cameras would be separated from each other. I wanted to see all 3 of the cameras placed in the right order and mixed in with each other.

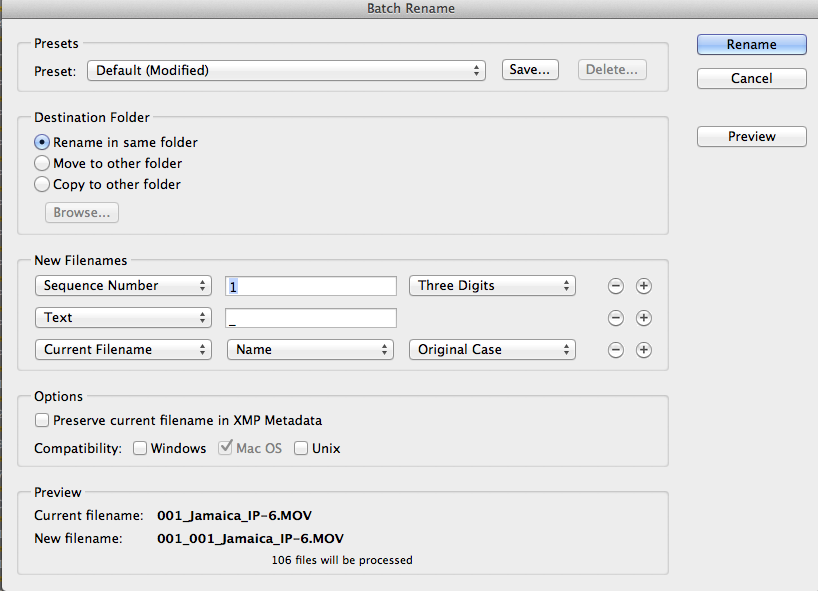
    I decided that my only solution needed to happen before I ever took my clips into Premiere Pro. I opened up Bridge CC, made sure to sort my folder of videos by Date Created, and simply evoked the Tools-Batch Rename option. There, I set up a few custom rules to basically keep my original file names while adding a 3 digit sequential numbering to the front of my file name.

    Batch Rename

    Now, when I load my clips back into Premiere I can simply sort by Name and know that my clips are in the right order. I should warn that this project is a single person type of operation, so if you are sharing clips with others and need to make sure you have the same file names this would not be the way to go. This is a distructive process (unless perhaps you save the originals in metadata and find a way to go back), so please use caution when using this workaround yourself.

    To make sure Adobe knows about this bug and sees there is demand to fix it, file a bug report by clicking here.

  • Switcher’s Guide – Premiere Pro Speed Changes & Freeze Frames

    In this video we discuss the numerous similarities and differences between speed changes and freeze frames in Premiere Pro and FCP7.

    (more…)

  • Conform in your NLE with Our New Software

    Anyone who works in a facility that works with an offline and online process probably knows that the online, or conform, process has typically been handled by the big guys. Smoke, Flame, Pablo, you know, the expensive ones. (Ok, maybe Smoke isn’t THAT expensive anymore, but you get the point).

    The main reason for this is trying to relink an offline edit to your trimmed color correct files has always been a nightmare. If you were to take an offline EDL or XML into FCP7 or Premiere Pro, and try to reconnect to the clips manually, it was an insanely tedious if not impossible process. Those applications want clips to be the same length as the original, the same names, the same frame size. With a color correct, however, that won’t be the case. Maybe you did your offline edit at proxy resolution. Maybe your file names have changed. And even if none of that happened, the clips length won’t match. When you edit, you edit with long clips. Then you might use a few seconds of a several minute clip. Color correct with a few seconds of handles, and want to relink. You might also have several source clips from the same original clip, necessitating new file names.

    That is where reLink reTooled comes in. You take your offline edit and export an xml. Then open up reLink reTooled, load that XML and point it to your new media. Then you can choose your relink criteria and save out an XML that references your new media. That’s all. I’ve been using this tool for many months now, and have put it to the test on large national clients. Using a combination of FCP7 and After Effects, conforms have been simplified and transformed from the days of capturing from a D5. The whole process is intuitive and simple. But your best bet is to just watch the video and see it in action. Check out a brief teaser above and a full demonstration below.

  • Premiere Pro New Features – Nudge Audio Volume with the Keyboard

    Another one that pretty much explains itself in the title. You can now easily make clips louder or quieter without ever grabbing the mouse!

  • Premiere Pro & SpeedGrade New Features – SpeedGrade Back & Forth

    Adobe acquired SpeedGrade just before the release of CS6, so the integration between Premiere Pro and SpeedGrade was fairly minimal.  (more…)

  • Premiere Pro New Features – Single Sequence XML

    In Premiere Pro CS6 if you wanted to export an XML of your edit, you were stuck giving an XML of your whole project.

    (more…)

  • Premiere Pro New Features – Duplicate Frame Indicators

    Do you like repeating the same material over and over and over (and over) again in your edits?

    (more…)