Category: Editorial

  • Tip on Grading Using the Direct Link between Premiere Pro and SpeedGrade

    In this video we go over a tip to let you easily turn your color grading on and off for ALL of your clips at once when using the new Direct Link between Premiere Pro CC and SpeedGrade CC.


    Follow us at @reToolednet on Twitter. twitter.com/reToolednet
    Like us on Facebook at facebook.com/retooled.net
    Follow us on Google+ at plus.google.com/+RetooledNet/

  • Direct Link between SpeedGrade CC and Premiere Pro CC

    With the introduction of the SpeedGrade CC 7.1 and Premiere Pro CC 7.1 Updates today, everyone will get their hands on the awesome new Direct Link feature between Premiere Pro and SpeedGrade. This feature allows us to quickly open a Premiere timeline directly in SpeedGrade do our color correction and then return to Premiere without having any of the complications of rendering, xmls, edls, or intermediate files. In my early testing, I can attest to the ease of the new workflow, but there is one caveat I wanted to make sure everyone is aware of. Watch the video for full information and warning about using Lumetri Looks in Premiere and sending them over to SpeedGrade.

  • Overlay Settings in Premiere Pro 7.1

    In this video we talk about the new Overlays for the Source and Program monitors of Premiere Pro. We also talk about ways to customize these settings to your liking. The video demonstrates the information you can easily keep on your screen to view all of the relevant data about your timeline.


  • New Features in the Premiere Pro 7.1 Update

    This video goes over 14 of the best features and enhancements to the October 2013 update to Premiere Pro, Premiere Pro 7.1. Adobe has promised this update in late October 2013, so to get all you up to speed before you even get your hands on it, we’ve prepared a video about the updates. And yes, We Save the Best for Last!

    Here is the breakdown:

    1. Add Edit takes clip selection into effect over track targeting
    2. Organizing Camera Angles in Multicam Mode and Seeing Effect Previews
    3. Editable Sequence Settings
    4. Cinema DNG supported
    5. Monitor Overlays with ability to transmit to broadcast monitor
    6. Frame hold options for much better hold frames.
    7. Relink and Keep interpret footage settings
    8. Ripple Sequence Markers
    9. Copy and Paste Transitions to multiple edit points at once
    10. Negative Value for speed duration instead of having to check reverse
    11. Preference to change trim type for selected edit point
    12. Sequence Hover Scrub and Thumbnail Preview
    13. Render Multiple Sequences at Once
    14. Direct Link to SpeedGrade

  • 10 Things Final Cut 7 Switchers Should Know about Premiere Pro CC

    I often get asked by coworkers or colleagues, “What are the main differences between FCP7 and Premiere Pro?” And the truth is, there are a lot of similarities between the two applications, but there are also a ton of little differences. This video features 10 things that I think any new Premiere Pro users should know. This one is definitely on the longer side for our videos, but I think the tips are really helpful. So hangin there, and let us know if have any questions.

    And the synopsis from Premium Beat:

    10 things that FCP7 editors should know about Premiere Pro include:

    1. Scratch disks are project based
    2. There is less transcoding necessary
    3. Setting render codec (codec settings not as ‘important’)
    4. Partial renders on clips are not maintained
    5. Audio tracks are handled differently, stereo is on one track
    6. Premiere Pro has powerful audio sync tools
    7. Changes to simple editing (smoother process in Premiere)
    8. Copy and paste clips onto different tracks
    9. Scrubbing is possible in the Premiere Pro project panel
    10. Batch export in the background while editing

    UPDATE: In terms of batch export, you can now queue it via, cmd-M with multiple clips selected. No more having to drag over to media encoder.

    10 Premiere Pro CC Tips for Final Cut Pro Video Editors

  • Saturday Night Live Film Unit Adds reLink reTooled to Workflow for Stefon’s Farewell

    When the Saturday Night Live season finale aired on May 18, the cast bid farewell to longtime Weekend Update correspondent Stefon in a sketch that used pre-recorded elements conformed on the innovative new tool reLink reTooled.

    The short was directed by Rhys Thomas and shot by Alex Buono. Editor Adam Epstein cut the piece inspired by 1967’s The Graduate using Adobe Premiere Pro CS6. Colorist Emery Wells of Katabatic Digital color-corrected the footage in Scratch and rendered the final material to Apple ProRes 4444 for the final conform process. The piece was shot using a combination of Arri Alexa, Red Epic, and Canon EOS 1D-C cameras.

    In previous edits, Epstein was forced to realign every shot in the Premiere Pro timeline, redo any repositions, blow-ups, and speed changes and make sure they matched the original offline cut. For the final Stefon sketch, Epstein turned to reLink reTooled, the groundbreaking tool that uses industry standard XML to relink to files of different durations and file names without the frustrations of traditional editing applications.

    With the tight timeline of SNL production and post schedule, Epstein shaved precious time off of the process by automating the relinking process and maintaining key information like speed changes and motion properties. “We’re always working up to the last minutes before air, and the final color-corrected overcut is normally the final step. Being able to automate what is often a frantic process and have spare time to focus on other details of the piece is an immense help,” he said.

    reLink reTooled can be used with programs like Premiere Pro and Final Cut Pro and allows editors to relink timelines with user-selectable metadata.

    Watch Stefon’s sendoff:
    http://www.hulu.com/watch/491721

    Learn more about reLink reTooled:
    http://www.retooled.net/?page_id=784

    Pricing and Availability 

    reLink reTooled is available immediately, priced at $39.99.

    reTooled.net is all about making your life easier. Tutorials in editorial, design and compositing, plus innovative new tools like reLink reTooled, maximize standard desktop applications and streamline everyday tasks. For more information, visit http://www.retooled.net.
  • New Features in Premiere Pro CC 7.0.1 Update!

    Well, it seems Adobe has kept their promise to use the new Creative Cloud platform to deliver a whole slew of new features. Now I don’t just mean bug updates as we had seen in the past with the Creative Suite, I mean upwards of 25 new features. In this video we go through the biggest changes to Premiere Pro CC and what you should know and expect from these new features.

    And yes, I don’t talk about in this video and I haven’t tested it myself, but there is a fix in this update for the horrible Multicam bug that a lot of users were experiencing!

    Check out the video as these really are some big new features.

    For a full list of features visit this link.

  • Media Manager or Project Manager in conjunction with reLink reTooled – Work From Home

    Ok, so if you’ve been following the site you probably know about reLink reTooled. You know that it was created to be able to relink files of different titles and durations, for things like relinking an offline edit to a color correct.

    What you may not have realized is there is a ton of other ways to use it. In this video, we talk about using it in conjunction with Final Cut Pro 7’s Media Manager or Premiere Pro’s Project Manager. Now we all know we can use these features to archive our projects to make our project smaller. But we can also use them to be able to take our projects on the road without the overhead of all of the original media.

    So here’s the scenario, you’ve been working all day on an edit and its starting to get late. You want to finish up the edit at home, but you don’t have time to copy all of the media to an external drive. After all, a large edit could easily contain hundreds of gigabytes worth of footage. Sure, you could media manage your project so you can trim your sequence down to just a few seconds of handles to finish your edit, but how would you then get your edit relinked to your original media when you get back to the office.

    Enter reLink reTooled…

    Just remember, all of your media needs to be .mov files for this workflow to work!

  • Working Around a Premiere Pro CC Bug to Sort in Icon View

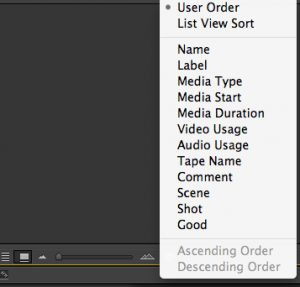
    So, if you are like me, you were really excited that Premiere Pro CC got the much needed ability to sort in Icon View. There are a number of predefined methods you can sort by, and you can even create a custom sorting order by using metadata in list view and choosing the “List View Sort”. For more info on these great new features, see this article.

    ListView

    However, the big disappointment is that as of right now, these custom sort methods don’t actually work in List View or Icon View. Meaning, you can click on the column header to sort, but it just won’t take! You can see this issue in the video linked to above. Now, this post isn’t intended to bash the engineers at Adobe, hopefully they are hard at work on the solution as we speak. It is merely intended to give you guys a potential work around.

    For me the issue was that I wanted to be able to sort in Date Created order. I had a number of cameras that name their files differently, shoot to different formats and frame rates, and don’t shoot any meaningful timecode. If I merely sorted by Name, it would sort each camera in Date Created order, but all 3 cameras would be separated from each other. I wanted to see all 3 of the cameras placed in the right order and mixed in with each other.

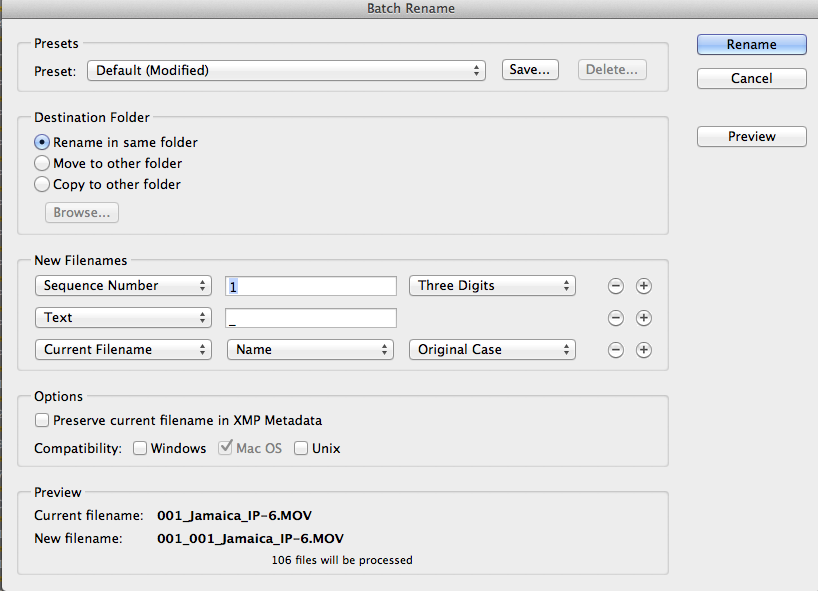
    I decided that my only solution needed to happen before I ever took my clips into Premiere Pro. I opened up Bridge CC, made sure to sort my folder of videos by Date Created, and simply evoked the Tools-Batch Rename option. There, I set up a few custom rules to basically keep my original file names while adding a 3 digit sequential numbering to the front of my file name.

    Batch Rename

    Now, when I load my clips back into Premiere I can simply sort by Name and know that my clips are in the right order. I should warn that this project is a single person type of operation, so if you are sharing clips with others and need to make sure you have the same file names this would not be the way to go. This is a distructive process (unless perhaps you save the originals in metadata and find a way to go back), so please use caution when using this workaround yourself.

    To make sure Adobe knows about this bug and sees there is demand to fix it, file a bug report by clicking here.

  • Marker Features and Changes in Premiere Pro CC

    WARNING, THIS ARTICLE IS OUTDATED. SEE UPDATES AT THE BOTTOM:

    Markers saw a major overhaul in Premiere Pro CS6, and these features saw a few enhancements in Premiere CC. While these features may not address all of users issues with the marker system in Premiere, it certainly goes a long way to improving a few of the pain points.

    (more…)